How to Convert a single-instance Oracle database to RAC
Single Instance–to-RAC Conversion
A single-instance Oracle database can be converted using several methods, which include Database Configuration Assistant (DBCA), Enterprise Manager, and the RCONFIG utility. You can use one of these tools based on your needs.
Before converting a single-instance database to a RAC database, ensure that your system meets the following conditions:
- It has supported hardware and operating system configuration.
- It has shared storage. A supported Cluster File System, network file system (NFS) mount, or ASM is available and accessible from all nodes.
- Your applications have no design characteristics that preclude their use with cluster database processing.
Considerations for Converting Single-Instance Databases to Oracle RAC
Whatever method you choose to use for the conversion, note the following administrative considerations before converting single-instance databases to Oracle RAC:
- Backup procedures should be available before converting from a single-instance Oracle database to Oracle RAC. You should take a backup of your database before starting any major change.
- For archiving with Oracle RAC environments, the archive file format requires a thread number.
- The archived logs from all instances of an Oracle RAC database are required for media recovery. Because of this, if you archive to a file and you do not use a cluster file system, or some other means to provide shared file systems, then you require a method of accessing the archive logs from all nodes on which the cluster database has instances.
- By default, all database files are migrated to Oracle Managed Files (OMF). This feature simplifies tablespace creation, ensures data file location consistency and compliance with Optimal Flexible Architecture (OFA) rules, and reduces human error with data file management.
Scenario 1: Using DBCA
Conversion steps for a single-instance database in a non-clustered environment:
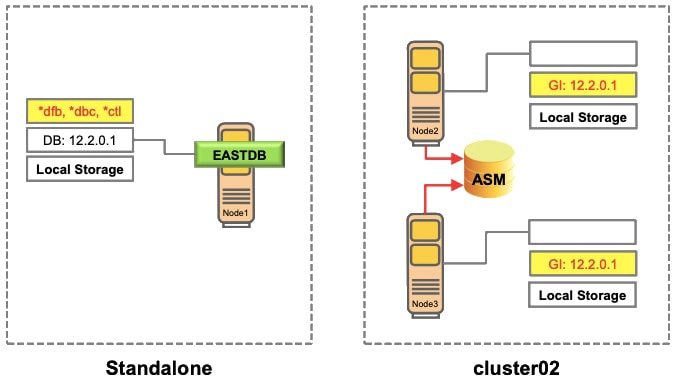
Current setup: Single node database (EASTDB), ver: 12.2.0.1, server: node1 Conversion to: 2 nodes RAC setup, servers: node2 and node3
You can use DBCA to convert from single-instance Oracle databases to Oracle RAC or Oracle RAC One Node databases. DBCA automates the configuration of the control file attributes, creates the undo tablespaces and the redo logs, and creates the initialization parameter file entries for cluster-enabled environments. DBCA also configures Oracle Net Services, Oracle Clusterware resources, and the configuration for Oracle RAC database management using Oracle Enterprise Manager or the Server Control utility (SRVCTL).
To convert from a single-instance Oracle database that is on a non-cluster computer to a RAC database, perform the following steps:
- Create an image of the single-instance database using DBCA.
- Create an Oracle Cluster for RAC.
- Copy the preconfigured database image files.
- Create an Oracle RAC database using DBCA.
Step 1: Create an Image of the Single-Instance Database
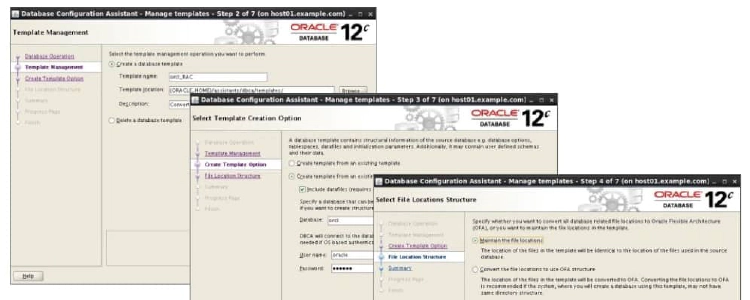
Use the DBCA to create a preconfigured image of your single-instance database by using the following procedure:
- Navigate to the bin directory in $ORACLE_HOME, and start the DBCA.
- In the Welcome window, click Next.
- In the Operations window, select Manage Templates, and click Next.
- In the Template Management window, select “Create a database” template and “From an existing database (structure as well as data),” and click Next.
- In the Source Database window, enter the database name in the Database instance field, and click Next.
- In the Template Properties window, enter a template name in the Name field. By default, the template files are generated in $ORACLE_HOME/assistants/dbca/templates. Enter a description of the file in the Description field, and change the template file location in the Template data file field if you want. When you have finished, click Next.
- In the Location of Database Related Files window, select “Maintain the file locations” so that you can restore the database to the current directory structure, and click Finish. The DBCA generates two files: a database structure file (*.dbc) and a database preconfigured image file (*.dfb).
Example: Result of Step 1
- The DBCA generated three files: a database structure file (*.dbc), a control file (*.ctl), and a database preconfigured image file (*.dfb). - The default location of these files is $ORACLE_HOME/assistants/dbca/templates.
Step 2: Create an Oracle Cluster for RAC
1. Perform the pre-installation steps. – Tasks include kernel parameter configuration, hardware setup, network configuration, and shared storage setup.
2. Set up and validate the cluster.
- Create a cluster with the required number of nodes according to your hardware vendor’s documentation.
- Validate cluster components before installation.
- Install Oracle Clusterware.
- Validate the completed cluster installation by using cluvfy.
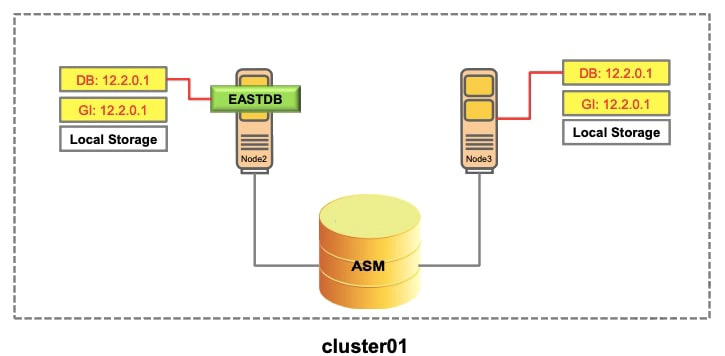
Example: Result of Step 2
Created a 2-node Oracle Cluster called cluster02 for RAC by installing the Grid Infrastructure software on node 2 and node 3.
Step 3: Copy the Preconfigured Database Image
-
Copy the preconfigured database image to a temporary location in one of the cluster nodes.
- The database structure *.dbc file
- The preconfigured database image *.dfb file
- The control file image *.ctl file
-
Move the database structure *.dbc file to the $ORACLE_HOME/assistants/dbca/templates directory.
-
Modify the *.dbc file to point to the preconfigured database image file in the temporary location.
Example: Database Structure File (*.dbc)
The text below shows the content of the database structure file (*.dbc). You need to modify this file if the location of the preconfigured database image (*.dfb) is different from the path specified in the file.
$ cd $ORACLE_HOME/assistants/dbca/templates
$ vi template_name.dbc
------ The Output Truncated------

<DataFiles>
  <Location>
    {ORACLE_HOME}/assistants/dbca/templates/template_name.dfb
  <Location>
  <SourceDBName cdb="false">eastdb

------ The Output Truncated------
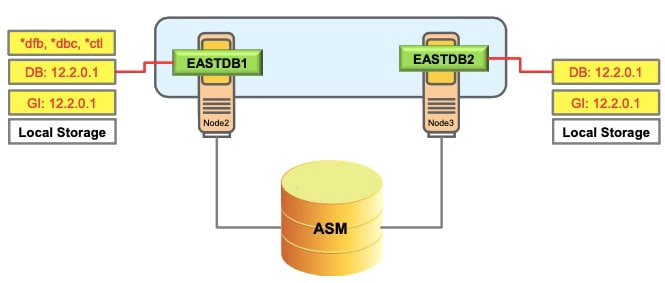
Example: Result of Step 3
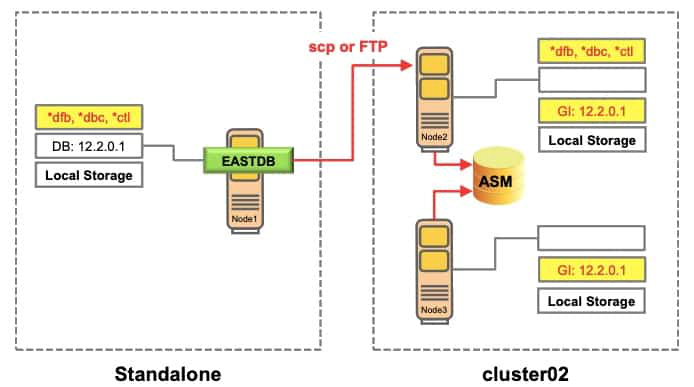
- Copied the preconfigured image files to the local storage of node 2
- Moved the template file (*.dbc) to $ORACLE_HOME/assistants/dbca/templates directory
- Modified the template file (*.dbc) to point to the location where the preconfigured database image (*.dfb) was copied.
Step 4: Create an Oracle RAC Database
Install the Oracle Database 12c Software with RAC:
- Run the Oracle Universal Installer (OUI) to perform an Oracle database installation with RAC. Select Cluster Installation Mode and select the nodes to include in your RAC database.
- On the Oracle Universal Installer Database Configuration Types page, select the Advanced installation type. After installing the software, the OUI runs post-installation tools such as NETCA, DBCA, and so on
- In the DBCA Template Selection window, use the template that you copied to a temporary location in the “Copy the Preconfigured Database Image” step. Use the Browse option to select the template location
- After creating the RAC database, the DBCA displays the Password Management page in which you must change the passwords for database privileged users. When the DBCA exits, the conversion is complete.
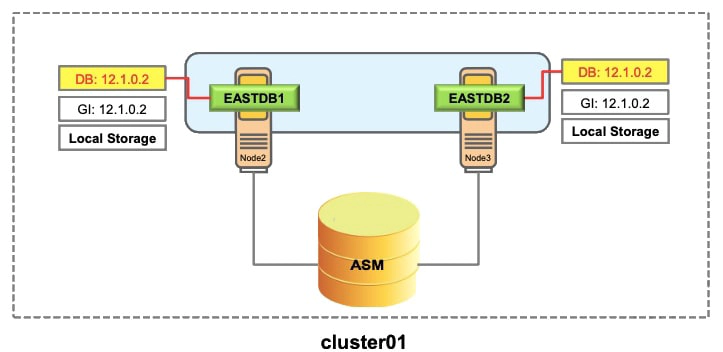
Scenario 2: Using rconfig
You can use the rconfig utility to convert from single-instance Oracle databases to Oracle RAC or Oracle RAC One Node databases. The rconfig utility automates many conversion steps.
To convert from a single-instance Oracle database that is on a cluster computer to a RAC database, perform the following steps:
- Check the database type.
- Modify the XML file for the rconfig utility.
- Perform prerequisite checks.
- Convert to an Oracle RAC database.
- Verify the conversion.
Step 1: Check the Database Type
The database type is SINGLE, which indicates a single-instance database.
$ srvctl config database –db eastdb
Database unique name: eastdb
Database name: eastdb
Oracle home: /u01/app/oracle/product/12.2.0/dbhome_1
Oracle user: oracle
Spfile: +DATA/eastdb/spfileeastdb.ora
Password file: +DATA/eastdb/orapweastdb
Domain: cluster01.example.com
Start options: open
Stop options: immediate
Database role: PRIMARY
Management policy: AUTOMATIC
Server pools: eastdb
Database instances: eastdb
Disk Groups: DATA,FRA
Mount point paths:
Services:
Type: SINGLE
...
Database is administrator managed
Step 2: Modify the XML File for the rconfig Utility
Before running the rconfig utility, modify the XML file as required for your system. 1. Go to the $ORACLE_HOME/assistants/rconfig/sampleXMLs directory as the oracle user and modify the ConvertToRAC_AdminManaged.xml or ConvertToRAC_PolicyManaged.xml file as required for your system using a text editor, such as vi.
2. Review the XML file, and modify the parameters as required for your system. The XML sample file contains comment lines that provide instructions about how to configure the file.
3. When you have finished making changes, save the file with the syntax filename.xml. Make a note of the name you select.
$ cd $ORACLE_HOME/assistants/rconfig/sampleXMLs
$ cp ConvertToRAC_AdminManaged.xml ConvertToRAC_AdminManaged.xml.bkp
$ vi ConvertToRAC_AdminManaged.xml
Example: ConvertToRAC_AdminManaged.xml
Modify the XML file as required for your system:
$ vi ConvertToRAC_AdminManaged.xml
<n:Convert verify="ONLY">
<n:SourceDBHome>/u01/app/oracle/product/12.2.0/dbhome_1</n:SourceDBHome>
<n:TargetDBHome>/u01/app/oracle/product/12.2.0/dbhome_1</n:TargetDBHome>
<n:SourceDBInfo SID="eastdb">
<n:Node name="enode01"/>
<n:Node name="enode02"/>
<n:InstancePrefix>eastdb</n:InstancePrefix>
<N:Password>oracle_4U<n/:Password>
<n:TargetDatabaseArea></n:TargetDatabaseArea>
<n:TargetFlashRecoveryArea></n:TargetFlashRecoveryArea>
Change the password for sys user using SQL*Plus to match the Password parameter in the XML file.
The code above shows an example of the input parameters for the rconfig XML file.
- SourceDBHome and TargetDBHome are same if the single-instance database is already running out of the RAC-enabled Oracle Home.
- Leave the TargetDatabaseArea and TargetFlashRecoveryArea parameters as empty if the database is already in the desired shared storage.
- Change the password of sys user to match oracle_4U in the XML file.
- Convert verify=“YES”: rconfig performs checks to ensure that the prerequisites for singleinstance to RAC conversion have been met before it starts conversion.
- Convert verify=“NO”: rconfig does not perform prerequisite checks, and starts conversion.
- Convert verify=“ONLY”: rconfig performs only prerequisite checks; it does not start conversion after completing the prerequisite checks.
Step 3: Perform Prerequisite Checks
Run rconfig with Convert verify=“ONLY” to perform a test conversion to ensure that a conversion can be completed successfully:
$ rconfig ConvertToRAC_AdminManaged.xml
<?xml version="1.0" ?>
<RConfig version="1.1" >
<ConvertToRAC>
  <Convert>
    <Response>
      <Result code="0" >
       Operation Succeeded
      </Result>
    </Response>
    <ReturnValue type="object">
There is no return value for this step
  </Convert>
</ConvertToRAC></RConfig>
The default listener must be configured in Grid Infrastructure Home. rconfig with Convert verify=“ONLY” does not check if the default listener is configured in Grid Infrastructure Home or not. However, it is checked when running rconfig with Convert verify=“YES”. If the default listener is configured in Oracle Database Home, you will receive the following messages:
[oracle@enode01 sampleXMLs]$ rconfig ConvertToRAC_AdminManaged.xml
...
oracle.sysman.assistants.rconfig.engine.InvalidConfigurationException:
oracle.sysman.assistants.rconfig.engine.InvalidConfigurationException: default listener is not configured in grid infrastructure home.
Operation Failed. Refer logs at
/u01/app/oracle/cfgtoollogs/rconfig/rconfig_09_18_15_17_28_33.log for more
details.
...
Step 4: Convert to an Oracle RAC Database
Run rconfig with Convert verify=“YES" to start a conversion.
$ rconfig ConvertToRAC_AdminManaged.xml
Converting Database "eastdb" to Cluster Database. Target Oracle Home:
/u01/app/oracle/product/12.2.0/dbhome_1. Database Role: PRIMARY.
Setting Data Files and Control Files
Adding Database Instances
Adding Redo Logs
Enabling threads for all Database Instances
Setting TEMP tablespace
Adding UNDO tablespaces
Adding Trace files
Setting Fast Recovery Area
Updating Oratab
Creating Password file(s)
Configuring Listeners
Configuring related CRS resources
Starting Cluster Database

------ The Output Continued next page ------
During the conversion, the rconfig utility performs the following operations:
- Setting data files and control files
- Adding database instances
- Adding redo logs
- Enabling threads for all database instances
- Setting TEMP tablespace
- Adding UNDO tablespaces
- Adding Trace files
- Setting Fast Recovery Area
- Updating Oratab
- Creating password file(s)
- Configuring listeners
- Configuring related CRS resources
- Starting cluster database
Step 4: Convert to an Oracle RAC Database
The output shows that the conversion has been completed successfully.
<?xml version="1.0" ?>
 <RConfig version="1.1" >
 <ConvertToRAC>
   <Convert>
     <Response>
       <Result code="0" >
        Operation Succeeded
       </Result>
     </Response>
     <ReturnValue type="object">
<Oracle_Home>
    /u01/app/oracle/product/12.2.0/dbhome_1
  </Oracle_Home>
  <Database type="ADMIN_MANAGED" >
    <InstanceList>
      <Instance SID="eastdb1" Node="enode01" >
      </Instance>
      <Instance SID="eastdb2" Node="enode02" >
      </Instance>
    </InstanceList>
  </Database> </ReturnValue>
 </Convert>
</ConvertToRAC></RConfig>
Step 5: Verify the Conversion
The database type is now RAC, which indicates a RAC database.
$ srvctl config database –db eastdb
Database unique name: eastdb
Database name: eastdb
Oracle home: /u01/app/oracle/product/12.2.0/dbhome_1
Oracle user: oracle
Spfile: +DATA/eastdb/spfileeastdb.ora
Password file: +DATA/eastdb/orapweastdb
Domain: cluster01.example.com
Start options: open
Stop options: immediate
Database role: PRIMARY
Management policy: AUTOMATIC
Server pools: eastdb
Database instances: eastdb1,eastdb2
Disk Groups: DATA,FRA
Mount point paths:
Type: RAC
...
Database is administrator managed
Example: Result of Using rconfig
A single-instance database in the clustered environment has been successfully converted to an Oracle RAC database without having to move the database files.