How to Install and Configure Oracle RAC 12c
Installing the Oracle Database Software
The Oracle Universal Installer (OUI) is used to install the Oracle Database 12c software. Start the OUI by executing the runInstaller command from the root directory of the Oracle Database 12c CD-ROM or from the software staging location.
$ /stage/database/runInstaller
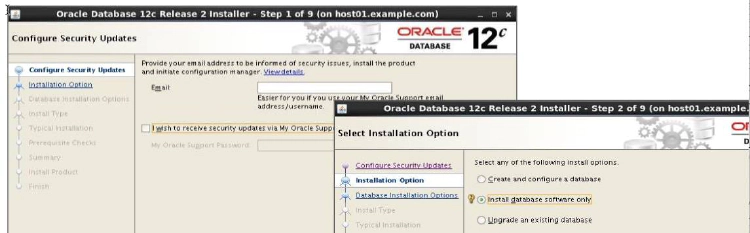
You can use the Configure Security Updates window to specify an email address to receive security updates directly from Oracle Support as they occur. Alternatively, you can elect to opt-out of these alerts. If you want to receive them, supply your email address and your Oracle Support password, and click Next.
The Download Software Updates page allows you to include database software updates or patches in the installation. The page allows you to either download them directly or use pre-downloaded updates. Alternatively, you can choose to bypass software updates entirely.
The Select Installation Option window enables you to create and configure a database, install database software only, or upgrade an existing database. Select the “Install database software only” option and click Next.
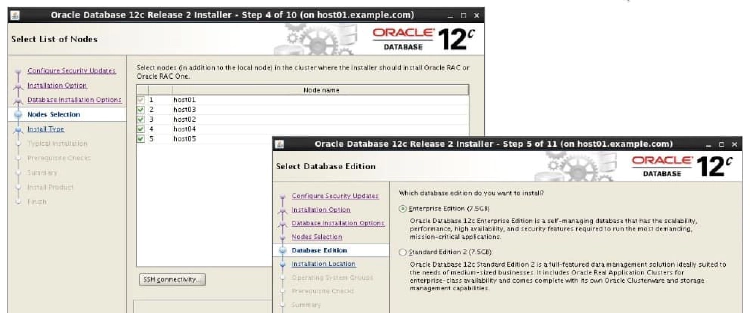
In the Grid Installation Options window, select “Real Application Clusters database installation” and select all nodes in your cluster on which the software should be installed. If SSH for the oracle user has not been set up, click SSH Connectivity, then provide the oracle user’s password and click Setup. If SSH has already been set up, click Test. When finished, click Next to continue. In the “Select Database Edition” window, you select whether to install the Enterprise Edition or the Standard Edition. Select the Enterprise Edition option and click Next to continue.
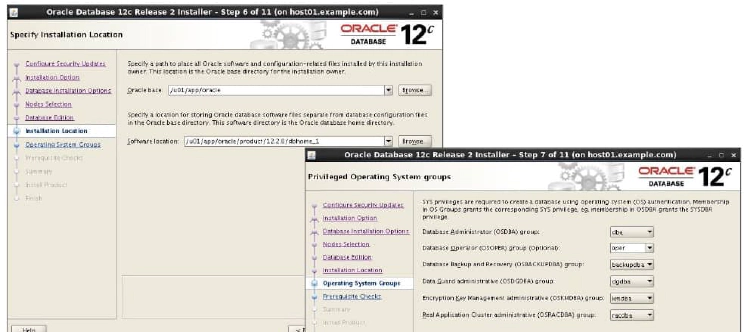
In the Specify Installation Location window, provide a value for ORACLE_BASE if you have not already done so. The default ORACLE_BASE location is /u01/app/oracle, provided the RDBMS software is being installed by the oracle account. The Software Location section of the window enables you to specify a value for the ORACLE_HOME location. The default ORACLE_HOME location is /u01/app/oracle/product/12.2.0/dbhome_1. Accept the suggested path or enter your own location. After entering the information, review it for accuracy, and click Next to continue. In the “Privileged operating system groups” window, select the operating system groups that will act as the OSDBA group and the OSOPER group. In addition, you can assign operating system groups to the database backup and recovery group, the Data Guard administrative group, the encryption key management administrative group, and Real Application Cluster administrative group. Click Next to continue.

The “Perform Prerequisite Checks” window verifies the operating system requirements that must be met for the installation to be successful. These requirements include:
- Certified operating system check
- Kernel parameters as required by the Oracle Database software
- Required operating system packages and correct revisions
After each successful check, the Status for that check will indicate Succeeded. Any tests that fail are also reported here. If any tests fail, click the “Fix & Check Again” button. The Installer will generate fix-up scripts to correct the system deficiencies if possible. Execute the scripts as directed by the Installer. The tests will be run again after completing the script executions. When all tests have succeeded, click Next to continue. In the Summary window, review the Global settings and click Finish.
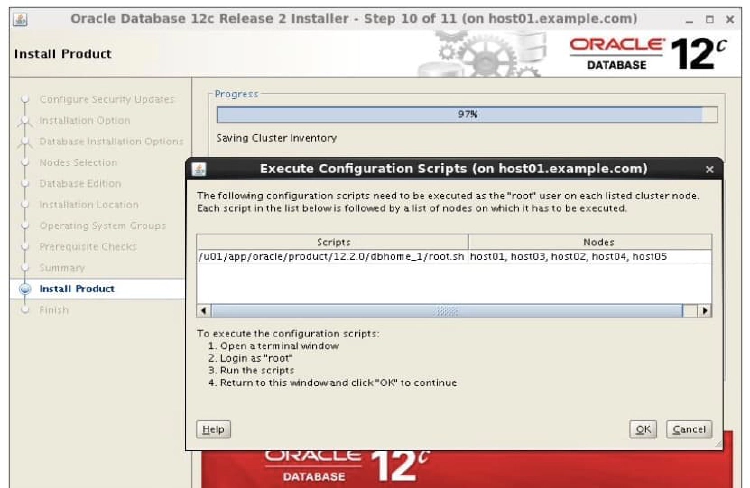
At the end of the installation, the OUI will display another window, prompting you to run the root.sh scripts on the nodes you chose for the installation. Follow the instructions to run the scripts. When finished, click the OK button to close the Execute Configuration Scripts window and return to the Finish screen. Click Close to complete the installation and close the OUI.
Creating the Cluster Database
To create the cluster database, change the directory to $ORACLE_HOME/bin on the installing node and execute the database configuration assistant (DBCA) utility as follows:
$ cd /u01/app/oracle/product/12.2.0/dbhome_1/bin
$ ./dbca
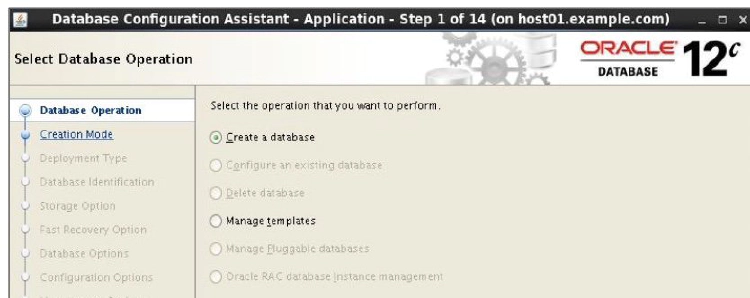
The Database Operation window appears first. You must select the database operation to perform. Select Create Database and then click Next. The Creation Mode window appears. You can choose to create a database by using the default configuration or you can choose Advanced Mode. Select Advanced Mode and click Next to continue.
Database Type Selection

The Database Templates window appears next. The Database Type pull-down menu allows you to choose to create an Oracle RAC database, an Oracle RAC One Node database, or a single instance database. The Configuration Type pull-down menu allows you to choose between Policy Managed and Administration Managed database configurations.
Administrator-managed RAC databases specify a list of cluster nodes where RAC instances will run. Services may also be specified and associated with preferred and alternative nodes. There is an explicit association between database services, instances, and cluster nodes.
Policy-based management breaks the explicit association between services, instances, and cluster nodes. Policy-based management employs server pools, which are logical divisions of a cluster that are dynamically allocated based on relative importance. Database services are associated with server pools, and RAC instances are automatically started to satisfy the service to server pool associations. You specify in which server pool the database resource will run and the number of instances needed (cardinality). Oracle Clusterware is responsible for placing the database resource on a server. Server pools are logical divisions of a cluster into pools of servers that are allocated to host databases or other applications. Server pools are managed by using the crsctl and srvctl commands. Names must be unique within the resources defined for the cluster.
The DBCA tool provides several predefined database types to choose from, depending on your needs. The templates include:
- Data Warehouse
- Custom Database
- General Purpose or Transaction Processing
In the example in the figure above, the “General Purpose or Transaction Processing” option is chosen. Click Next to continue.
Database Identification
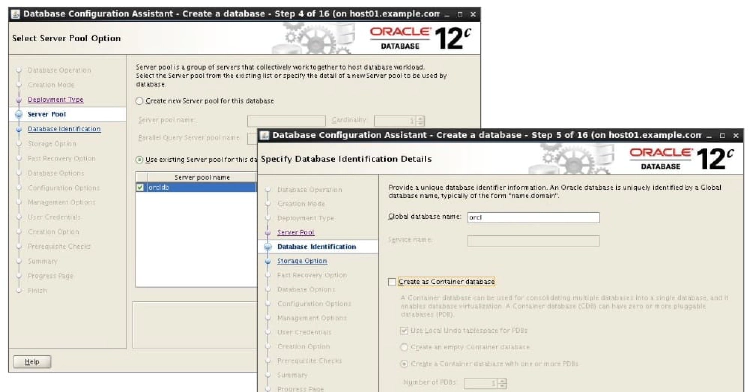
On the Server Pool Option page, you can choose to create a new server pool name for your database or you can elect to use an existing pool to place the database. If you create a new server pool, you will be required to set the cardinality. Click Next to continue.
In the Database Identification Details window, you must choose the global database name. The global database name can be up to 30 characters in length and must begin with an alphabetical character. The global database name is of the form database_name.database_domain. In addition, you can choose to create a clustered container database by selecting the Create as a Container Database check box. You can choose to create an empty container database or create it with one or more pluggable databases. If you elect to create a pluggable database, you will be required to provide a unique service name. When you have finished, click Next to continue.
Storage Options
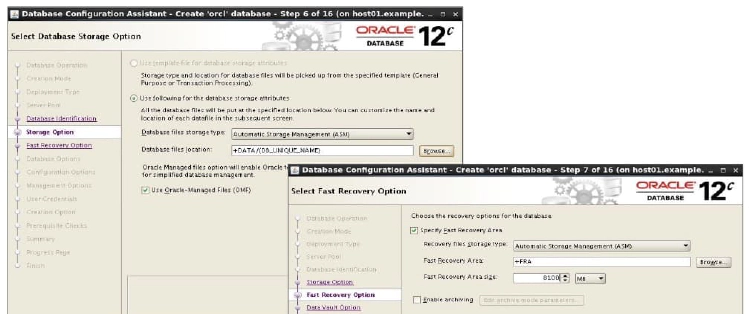
In the Database Storage option window, you must indicate where the database files are to be stored. You can choose your storage type from the drop-down list. Detected (and supported) shared storage types are available here. You can choose to use a standard template for file locations, one common location, or Oracle-Managed Files (OMF). This cluster database uses ASM and OMF. Therefore, select the Use OracleManaged Files option, and enter the disk group name in the Database Area field. Alternatively, you can click the Browse button to indicate the location where the database files are to be created.
On the Fast Recovery option page, you can select redo log archiving by selecting Enable Archiving. If you are using ASM or cluster file system storage, you can also select the fast recovery area size. The size of the area defaults to 8016 megabytes., but you can change this figure if it is not suitable for your requirements. If you are using ASM and a single disk group, the fast recovery area defaults to the ASM Disk Group. If more than one disk group has been created, you can specify it here. When you have completed your entries, click Next, and the Database Content window is displayed.
Database Content
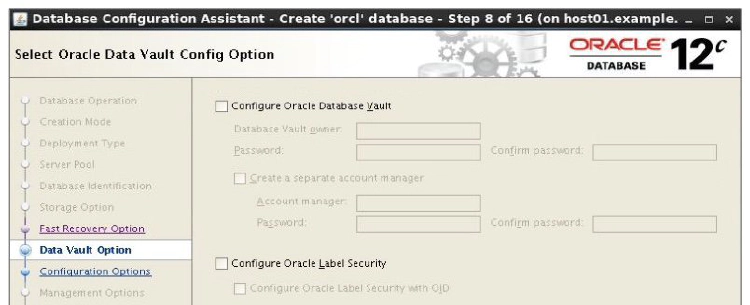
In the Oracle Database Vault Configure page, you can choose the Database Vault and Label Security option. If you choose to configure these, you must provide login credentials for the Database Vault owner. You can also choose to create a separate account manager here. Select the Configure Label Security check box to configure Label Security. When you have finished, click Next to continue to the next window.
Configuration Options
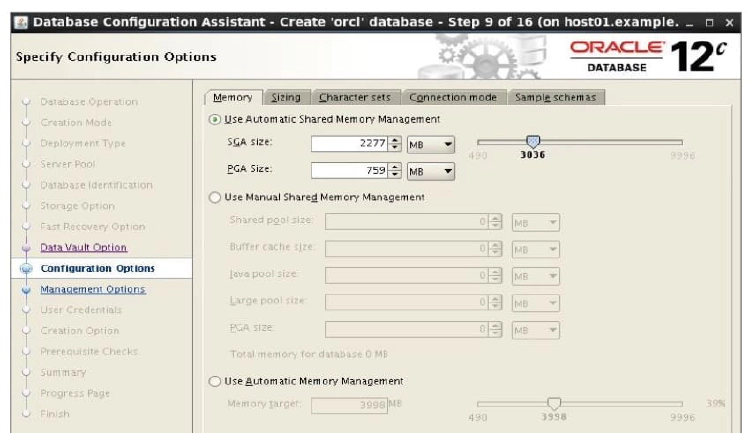
In the Configuration option window, you can set important database parameters. The parameters are grouped under five tabs:
- Memory
- Sizing
- Character Sets
- Connection Mode
- Sample Schemas
On the Memory tabbed page, you can set parameters that deal with memory allocation, including shared pool, buffer cache, Java pool, large pool, and PGA size. Automatic Memory Management is the preferred memory management method and can be selected here. On the Sizing tabbed page, you can adjust the database block size. In addition, you can set the number of processes that can connect simultaneously to the database.
By clicking the Character Sets tab, you can change the database character set. You can also select the default language and the date format. On the Connection Mode tabbed page, you can choose the connection type that clients use to connect to the database. The default type is Dedicated Server Mode. If you want to use Oracle Shared Server, click the Shared Server Mode button. On the Sample schemas page, you can choose to install the Sample Schemas included with the database distribution. If you want to review the parameters that are not found on the four tabs, click the All Initialization Parameters button. Click the Use Automatic Shared Memory Management button and click Next to continue.
Cluster Database Management Options
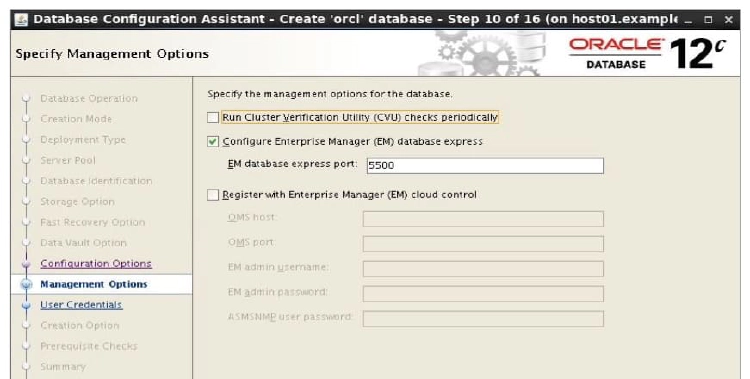
The Management Options window is displayed. For small cluster environments, you may choose to manage your cluster with Enterprise Manager Database Express. To do this, select the “Configure Enterprise Manager (EM) Database Express” check box. You can also elect to run CVU checks periodically.
If you have Grid Control installed somewhere on your network, you can select the “Register with Enterprise Manager (EM) Cloud Control” option. EM Cloud Control can simplify database management in large, enterprise deployments. If you select Enterprise Manager, you must provide the OMS hostname and the OMS port number. You must also provide login credentials for the EM administrative user.
If you want to use Grid Control to manage your database, but have not yet installed and configured a Grid Control server, do not click either of the management methods. When you have made your choices, click Next to continue.
Passwords for Database Schema Owners
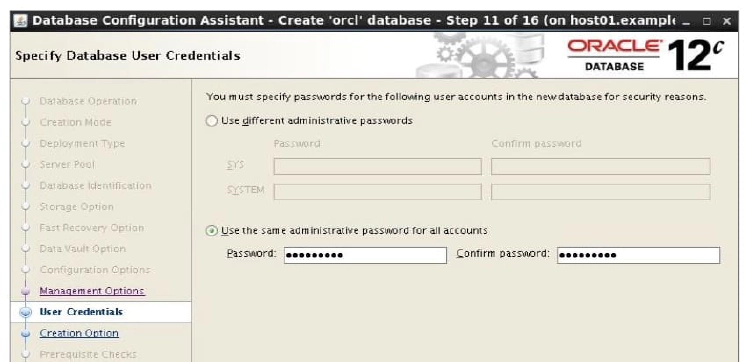
The Database Credentials window appears next. You must supply passwords for the user accounts created by the DBCA when configuring your database. You can use the same password for all of these privileged accounts by selecting the “Use the Same Administrative Password for All Accounts” option. Enter your password in the Password field, and then enter it again in the Confirm Password field.
Alternatively, you may choose to set different passwords for the privileged users. To do this, select the “Use Different Administrative Passwords” option, enter your password in the Password field, and then enter it again in the Confirm Password field. Repeat this for each user listed in the User Name column. Click Next to continue.
Create the Database
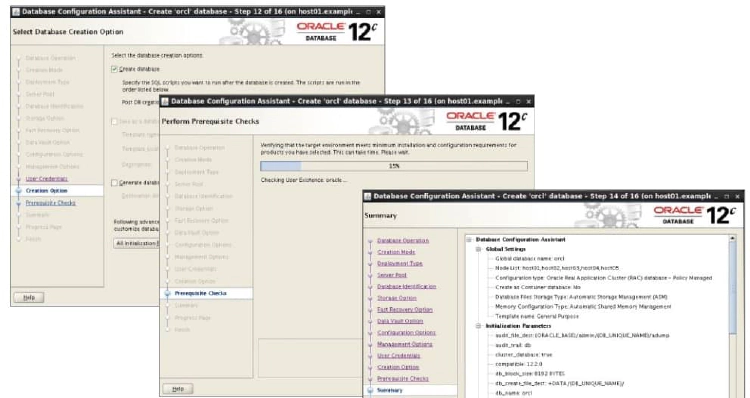
The Creation Options window appears. You can choose to create the database or save your DBCA session as a database creation script by selecting the corresponding check box. Select the Create Database check box, and then click the Finish button. The DBCA displays the Summary screen, giving you the last chance to review all options, parameters, and so on that have been chosen for your database creation.
Review the summary data. When you are ready to proceed, close the Summary window by clicking Finish.
Monitoring Progress
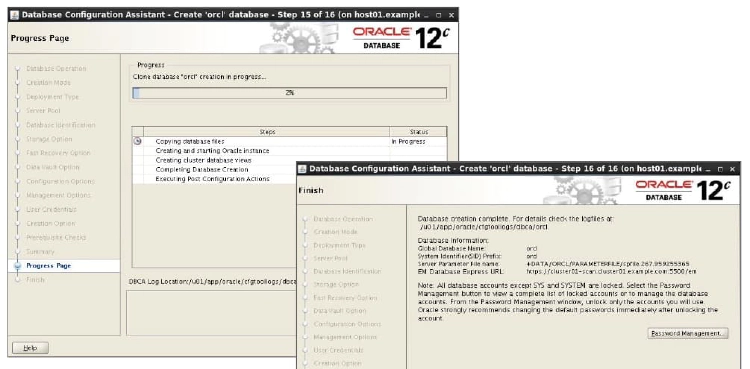
The Progress Monitor window appears next. In addition to informing you about how fast the database creation is taking place, it also informs you about the specific tasks being performed by the DBCA in real time. When the database creation progress reaches 100 percent, the DBCA displays the Finish page, announcing the completion of the creation process. It also directs you to the installation log file location, parameter file location, and Enterprise Manager URL. By clicking the Password Management button, you can manage the database accounts created by the DBCA.
Post-Installation Tasks
- Download and install the required patch updates.
- After the cluster database has been successfully created, run the following command to verify the Oracle Cluster Registry configuration in your newly installed RAC environment:
$ srvctl config database -db db_name
-Sample output:
$ srvctl config database -db orcl
Database unique name: orcl
Database name: orcl
Oracle home: /u01/app/oracle/product/12.2.0/dbhome_1
Oracle user: oracle
Spfile: +DATA/ORCL/PARAMETERFILE/spfile.289.863634609
Password file: +DATA/ORCL/PASSWORD/pwdorcl.276.863633507
Domain: cluster01.example.com
Start options: open
Stop options: immediate
Database role: PRIMARY
Management policy: AUTOMATIC
Server pools: orcldb
Disk Groups: DATA
Mount point paths:
Services:
Type: RAC
Start concurrency:
Stop concurrency:
...
Database instances:
Configured nodes:
Database is policy managed