Manage Linux Processes and Services
Process Definitions
The following terms are used to describe Linux processes:
- Program: A structured set of commands stored in an executable file on a Linux file system. A program can be executed to create a process.
- Process: A program that is running in memory and on the CPU.
- User Process: A process launched by a user that runs from a terminal.
- Daemon Process: A system process that is not associated with a terminal.
The following illustrates the relationship between daemon processes and user processes:
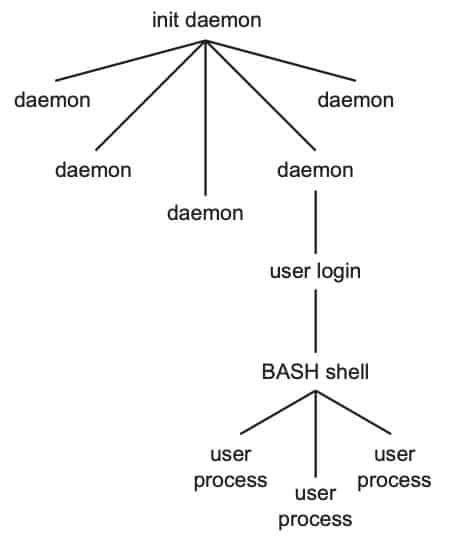
In this example, during the boot process of a Linux system, the init daemon launches several other daemons (daemon processes), including a daemon for user login. After the user logs in, the user can start a terminal window or virtual terminal with a BASH shell that lets the user start processes manually (user processes).
- Process ID (PID): A unique identifier assigned to every process as it begins.
- Child Process: A process that is started by another process (the parent process).
- Parent Process: A process that starts other processes (child processes).
- Parent Process ID (PPID): The PID of the parent process that created the current process.
Jobs and Processes
In Linux, you use a job identifier (commonly called a job ID) to refer to processes when using commands. The job identifier is a shell-specific numeric value that identifies the running program uniquely within that shell. On the other hand, each process (independent of a shell) is identified using a process ID (commonly called a PID) that is unique across the entire system. All jobs have a PID, but not all processes have a usable job identifier.
PID 1 always belongs to the init or systemd process. This is the first process started on the system and it creates a number of other processes, which in turn can generate additional processes. If PID 1 has been reached, the next process is allocated the lowest available number (such as PID 17494). Processes run for different lengths of time. After one process has ended, its number again becomes available.
When performing tasks such as changing the priority level of a running program, you use the PID instead of the job ID. When you want to switch a process from the background to the foreground (and the process was started from a terminal), you use the job ID.
How to Manage Foreground and Background Processes
The Linux shell environment allows processes to run in either the foreground or the background. Processes executed in the foreground are started in a terminal window and run until the process completes; the terminal window does not return to a prompt until the program’s execution is complete. Background process execution occurs when a process is started and the terminal window returns to a prompt before the process finishes executing.
Existing processes can be switched from foreground to background execution under the following circumstances:
- The process must be started in a terminal window or console shell.
- The process does not require input from the terminal window. If the process meets this criteria, it can be moved to the background.
Commands in a shell can be started in the foreground or in the background. Processes in the foreground can directly receive transmitted signals. For example, if you enter xclock to start the XCLOCK program, it is running in the foreground. If you press Ctrl+Z, the process stops:
[1]+  Stopped                 xclock
#
You can continue running a stopped process in the background by entering bg, as in the following:
# bg
[1]+ xclock &
#
The ampersand (&) displayed in the output means that the process is now running in the background. Appending an ampersand to a command starts the process in the background (instead of the foreground), as in the following:
# xclock &
[2] 4351
#
This makes the shell from which you started the program still available for user input. In the above example, both the job ID ([2]) and the process ID of the program (10982) are returned. Each process started from the shell is assigned a job ID by the job control of the shell. The command jobs lists the contents of job control, as in the following:
# jobs
[1]+  Stopped         xclock
[2]   Running         xclock &
[4]-  Running         sleep 200 &
#
In this example, the process with job ID 3 is already terminated. The processes 2 and 4 are running in the background (notice the ampersand), and process 1 is stopped. The next background process will be assigned the job ID of 5 (highest number + 1). Not only can you continue running a stopped process in the background by using the command bg, you can also switch a process to the foreground by entering fg job_ID, as in the following:
# fg 1
xclock
The shell also informs you about the termination of a process running in the background:
[4]- Done sleep 200
The job ID is displayed in square brackets. Done means the process terminated properly. If you see Terminated instead, it means that the process was requested to terminate. Killed indicates a forceful termination of the process.
How to Prioritize Processes
In addition to running jobs in the foreground or the background, you can view information about the processes and assign priorities by using the following tools:
- ps
- pstree
- nice and renice
- top
ps
You can view all running processes by using the command ps (process status). With the option x, you can also view terminal-independent processes, as in the following:
$ ps x
  PID   TTY     STAT   TIME      COMMAND
  361   pts/0   Ss     00:00     bash
  362   pts/0   S      00:00     sleep 200
  366   pts/0   R+     00:00     ps x
In the above example, the process with PID 362 is a terminal-independent process. If you do not include the option x with ps, the process does not appear (as in the following):
$ ps
  PID   TTY     STAT   TIME      COMMAND
  361   pts/0   Ss     00:00     bash
  366   pts/0   R+     00:00     ps
The following are some commonly-used options with the command ps:
| Option | Description |
|---|---|
| x | Select processes without controlling ttys. |
| a | Select all processes on a terminal, including those of other users. (Note: “a” is not the same as “-a.”) |
| -w, w | Provides detailed, wide output. |
| u | Display user-oriented format. |
| f | List processes hierarchically (in a tree format). |
For example, the output of entering ps axl is similar to the following:
# ps axl
F   UID    PID   PPID PRI  NI    VSZ   RSS WCHAN  STAT TTY        TIME COMMAND
4     0      1      0  20   0 192080  4684 ep_pol Ss   ?        781:58 /usr/lib/systemd/systemd --system --deserialize 22
1     0      2      0  20   0      0     0 kthrea S    ?          0:22 [kthreadd]
1     0      4      2   0 -20      0     0 worker S<   ?          0:00 [kworker/0:0H]
1     0      5      2  20   0      0     0 worker S    ?          0:02 [kworker/u32:0]
1     0      6      2  20   0      0     0 smpboo S    ?         15:09 [ksoftirqd/0]
...
However, the output of entering ps aux looks like the following:
# ps aux
USER        PID %CPU %MEM    VSZ   RSS TTY      STAT START   TIME COMMAND
root          1  0.1  0.0 192080  4684 ?        Ss    2020 781:58 /usr/lib/systemd/systemd --system --deserialize 22
root          2  0.0  0.0      0     0 ?        S     2020   0:22 [kthreadd]
root          4  0.0  0.0      0     0 ?        S<    2020   0:00 [kworker/0:0H]
root          5  0.0  0.0      0     0 ?        S     2020   0:02 [kworker/u32:0]
root          6  0.0  0.0      0     0 ?        S     2020  15:09 [ksoftirqd/0]
The basic difference is that with the option -l, you see the process ID of the father process (PPID), the process priority (PRI), and the nice value (NI) of the individual processes. With the -u option, the load percentage is shown (%CPU, %MEM).
The following is a description of each field (column) in the process list:
| Field | Description |
|---|---|
| UID | User ID |
| PID | Process ID |
| PPID | Parent process ID |
| TTY | Number of the controlling terminal |
| PRI | Priority number (the lower it is, the more computer time is allocated to the process) |
| NI (nice) | Influences the dynamic priority adjustment |
| STAT | Current process status |
| TIME | Computer time used |
| COMMAND | Name of the command |
The process state STAT can be one of the following:
| Code | Description |
|---|---|
| R (Runnable) | Process can be run |
| S (Sleeping) | Process is waiting for an external event (such as data arriving) |
| D (Uninterruptable sleep) | Comparable to “S” (the process cannot be terminated at the moment) |
| T (Traced or Stopped) | Process is suspended |
| X | Process is dead |
| Z (Zombie) | Process has terminated itself, but its return value has not yet been requested |
You can format the output of ps to present the information you need:
# ps ax --format 'cputime %C, nice %n, name %c'
cputime %CPU, nice  NI, name COMMAND
cputime  0.1, nice   0, name systemd
cputime  0.0, nice   0, name kthreadd
cputime  0.0, nice -20, name kworker/0:0H
cputime  0.0, nice   0, name kworker/u32:0
cputime  0.0, nice   0, name ksoftirqd/0
...
For detailed information about using the command ps, check the man page of ps command:
# man ps
pstree
With the command pstree, you can view a list of processes in the form of a tree structure. This gives you an overview of the hierarchy of a process.
To end a series of processes, find the appropriate parent process and end that instead. The option -p displays the PID of the processes. The option -u displays the user ID if the owner has changed. Because the list of processes is often long, you can enter ‘pstree -up | less’ to view part of the processes at a time.
nice and renice
Linux always tries to distribute the available computing time equitably to all processes. However, you might want to assign a process more or less computing time.
You can do this with the command nice, as in the following:
# nice -n +5 sleep 200
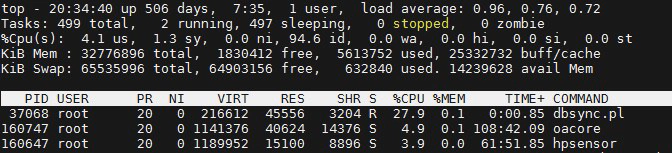
This command assigns a process a specific nice value that affects the calculation of the process priority (which is increased or decreased). If you do not enter a nice value, the process is started with the value +10. The NI column in the top list (see Figure 6-3) contains the nice value of the process. The default value 0 is regarded as neutral. You can assign the nice level using a numeric value of -20 to 19.
The lower the value of the nice level, the higher the priority of the process. A process with a nice level of -20 runs at the highest priority; a process with a nice level of 19 runs at the lowest priority. The nice level is used by the scheduler to determine how frequently to service a running process. Only root is permitted to start a process with a negative nice value (such as nice -n -3 sleep 99). If a normal user attempts to do this, an error message is returned.
You can use the command renice to change the nice value of a running process, increasing or reducing its priority, such as:
# renice 5 1712
In this example, the command assigns the process with the PID 1712 the new nice value 5. This can also be done in top by entering r. Only root can reduce the nice value of a running process (such as from 10 to 9 or from 3 to -2). All other users can only increase the nice value (such as from 10 to 11). For example, if the user geeko attempts to assign the process 28056 that currently has a nice value of 3 to a nice value of 1, a Permission denied message is returned.
top
The command top combines the functionality of the command ps and the command renice in a single utility that provides a real-time view of a running system. The information displayed in top can be filtered by a specific user, and can be sorted on any displayed field. By typing r, you can adjust the priority of a process, provided the you have sufficient privileges to do so.
When you enter top, a list similar to the following appears:
The displayed list is sorted by computing time and is updated every 5 seconds. You can terminate the display typing q. The following describes the default columns:
| Command | Description |
|---|---|
| PID | Process ID |
| USER | Username |
| PR | Priority |
| NI | Nice value |
| VIRT | Virtual Image (in KB) |
| RES | Resident Size (in KB) |
| SHR | Shared Mem Size (in KB) |
| S | Process Status |
| %CPU | CPU Usage |
| %MEM | Memory Usage (RES) |
| TIME+ | CPU time |
| COMMAND | Command name/line |
You can view the process management commands available in top by entering ? or h. The following are some of the more commonly-used commands:
| Command | Description |
|---|---|
| r | Assign a new nice value to a running process |
| k | Send a running process the termination signal (same as kill or killall) |
| N | Sort by process ID |
| P | Sort by CPU load |
How to End a Process
If a process loses the connection to the terminal controlling it (so it can no longer be controlled by keyboard input such as Ctrl+Z), you can use the following to end the process:
- kill
- killall
kill and killall
You can use the commands kill and killall to terminate a process. The command killall kills all processes with an indicated command name; the command kill kills only the indicated process. The command kill requires the PID of the process (use ps or top to find the PID). The command killall needs the command name of the process.
For example, if you enter xeyes at the command line to start the XEYES program (and the PID is 18734), you can enter kill 18734 or killall xeyes to end the process. A process can do one of the following when receiving a signal:
- Capture the signal and react to it (if it has a corresponding function available). For example, an editor can close a file properly before it is terminated.
- Ignore the signal if no function exists for handling that signal.
However, the process does not have control over the following 2 signals as they are handled by the kernel:
- kill -SIGKILL or kill -9
- kill -STOP or kill -19
These signals cause the process to be ended immediately (SIGKILL) or to be stopped (STOP). You should use SIGKILL with caution. Although the operating system closes all files that are still open, data in buffers is no longer processed. This means that some processes might leave the service in an undefined state, so it cannot easily be started again.
The following are the more commonly-used signals:
| Number | Name | Description |
|---|---|---|
| 1 | SIGHUP | Reload configuration file |
| 2 | SIGINT | Interrupt from keyboard (Ctrl+C) |
| 9 | SIGKILL | Kill process. |
| 15 | SIGTERM | End process immediately (terminate process in a controlled manner so clean-up is possible) |
| 18 | SIGCONT | Continue process stopped with STOP |
| 19 | STOP | Stop process |
For the kernel to forward the signal to the process, it must be sent by the owner of the process or by root. By default (without options), kill and killall send signal 15 (SIGTERM).
The following is the recommended way of ending an unwanted process:
1. Send SIGTERM by entering one of the following:
# kill -SIGTERM PID
or:
# kill -15 PID
or:
# kill PID
You can use killall instead of kill and the command name of the process instead of the PID.
2. Wait a few moments for the process to be cleaned up.
3. If the process is still there, send a SIGKILL signal by entering one of the following:
# kill -SIGKILL PID
or:
# kill -9 PID
You can use killall instead of kill and the command name of the process instead of the PID. If a process has been started from the bash shell, you can also use the job ID instead of the process number (such as kill %4).