Managing Backup and Recovery for Oracle RAC
Instance Recovery and RAC
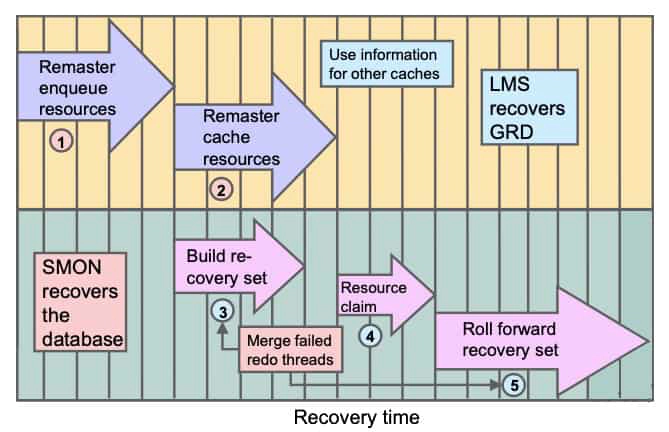
When an instance fails and the failure is detected by another instance, the second instance performs the following recovery steps:
- During the first phase of recovery, Global Enqueue Services remasters the enqueues.
- The Global Cache Services (GCS) remasters its resources. The GCS processes remaster only those resources that lose their masters. During this time, all GCS resource requests and write requests are temporarily suspended. However, transactions can continue to modify data blocks as long as these transactions have already acquired the necessary resources.
- After enqueues are reconfigured, one of the surviving instances can grab the Instance Recovery enqueue. Therefore, at the same time as GCS resources are remastered, SMON determines the set of blocks that need recovery. This set is called the recovery set. Because, with Cache Fusion, an instance ships the contents of its blocks to the requesting instance without writing the blocks to the disk, the on-disk version of the blocks may not contain the changes that are made by either instance. This implies that SMON needs to merge the content of all the online redo logs of each failed instance to determine the recovery set. This is because one failed thread might contain a hole in the redo that needs to be applied to a particular block. So, redo threads of failed instances cannot be applied serially. Also, redo threads of surviving instances are not needed for recovery because SMON could use past or current images of their corresponding buffer caches.
- Buffer space for recovery is allocated and the resources that were identified in the previous reading of the redo logs are claimed as recovery resources. This is done to avoid other instances to access those resources.
- All resources required for subsequent processing have been acquired and the Global Resource Directory (GRD) is now unfrozen. Any data blocks that are not in recovery can now be accessed. Note that the system is already partially available.
Then, assuming that there are past images or current images of blocks to be recovered in other caches in the cluster database, the most recent image is the starting point of recovery for these particular blocks. If neither the past image buffers nor the current buffer for a data block is in any of the surviving instances’ caches, then SMON performs a log merge of the failed instances. SMON recovers and writes each block identified in step 3, releasing the recovery resources immediately after block recovery so that more blocks become available as recovery proceeds.
After all the blocks have been recovered and the recovery resources have been released, the system is again fully available.
In summary, the recovered database or the recovered portions of the database become available earlier, and before the completion of the entire recovery sequence. This makes the system available sooner and it makes recovery more scalable.
Instance Recovery and Database Availability
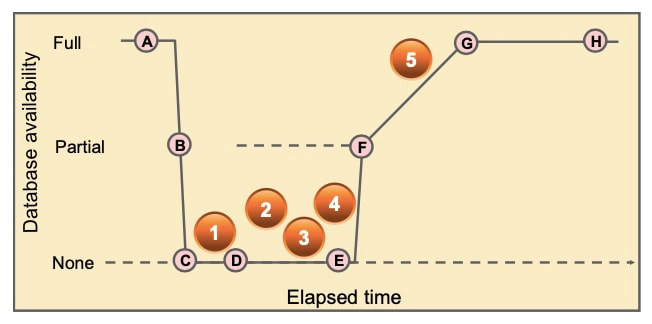
The graphic illustrates the degree of database availability during each step of Oracle instance recovery:
- Real Application Clusters is running on multiple nodes.
- Node failure is detected.
- The enqueue part of the GRD is reconfigured; resource management is redistributed to the surviving nodes. This operation occurs relatively quickly.
- The cache part of the GRD is reconfigured and SMON reads the redo log of the failed instance to identify the database blocks that it needs to recover.
- SMON issues the GRD requests to obtain all the database blocks it needs for recovery. After the requests are complete, all other blocks are accessible.
- The Oracle server performs roll-forward recovery. Redo logs of the failed threads are applied to the database, and blocks are available right after their recovery is completed.
- The Oracle server performs rollback recovery. Undo blocks are applied to the database for all uncommitted transactions.
- Instance recovery is complete and all data is accessible
Instance Recovery and RAC
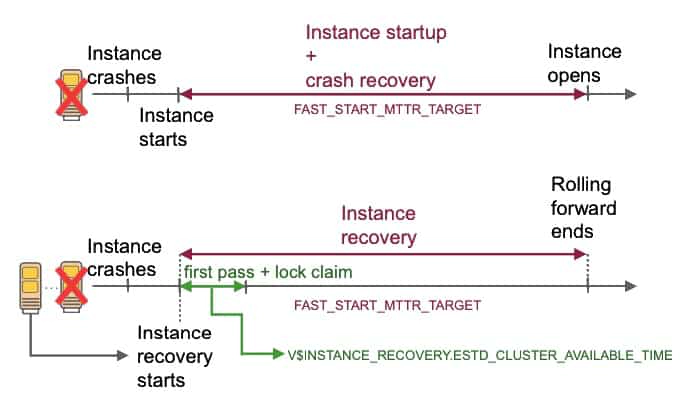
In a single-instance environment, the instance startup combined with the crash recovery time is controlled by the setting of the FAST_START_MTTR_TARGET initialization parameter. You can set its value if you want incremental checkpointing to be more aggressive than autotuned checkpointing. However, this is at the expense of a much higher I/O overhead.
In a RAC environment, including the startup time of the instance in this calculation is useless because one of the surviving instances is doing the recovery.
In a RAC environment, it is possible to monitor the estimated target, in seconds, for the duration from the start of instance recovery to the time when GRD is open for lock requests for blocks not needed for recovery. This estimation is published in the V$INSTANCE_RECOVERY view through the ESTD_CLUSTER_AVAILABLE_TIME column. Basically, you can monitor the time your cluster is frozen during instance-recovery situations.
In a RAC environment, the FAST_START_MTTR_TARGET initialization parameter is used to bound the entire instance-recovery time, assuming it is instance recovery for single-instance death.
If you really want to have short instance recovery times by setting FAST_START_MTTR_TARGET, you can safely ignore the alert log messages advising you to raise its value. Starting with Oracle RAC 12c Release 2, the Recovery Buddy capability can further reduce the instance recovery time.
When an instance fails, blocks that were recently modified by that instance may be in an inconsistent state on disk and must be recovered. A surviving instance must scan the redo log to recover these blocks before new transactions can modify the data. The Recovery Buddy capability creates a Buddy Instance to track modified data blocks on “buddy” nodes. If a node fails, the Buddy Instance can quickly identify which blocks require recovery, allowing new transactions on unaffected blocks to proceed rapidly and without having to wait for recovery determination.
This feature is especially significant in reducing recovery time in clusters where a lot of update activity is taking place.
Instance Recovery and RAC
Here are some guidelines you can use to make sure that instance recovery in your RAC environment is faster:
- Use parallel instance recovery by setting RECOVERY_PARALLISM.
- Set PARALLEL_MIN_SERVERS to CPU_COUNT-1. This will prespawn recovery slaves at startup time.
- If a system fails when there are uncommitted parallel DML or DDL transactions, you can speed up transaction recovery during startup by setting the FAST_START_PARALLEL_ROLLBACK parameter.
- Using asynchronous I/O is one of the most crucial factors in recovery time. The first-pass log read uses asynchronous I/O.
- Instance recovery uses 50 percent of the default buffer cache for recovery buffers. If this is not enough, some of the steps of instance recovery will be done in several passes. You should be able to identify such situations by looking at your alert.log file. In that case, you should increase the size of your default buffer cache.
Protecting Against Media Failure
Although RAC provides you with methods to avoid or to reduce downtime due to a failure of one or more (but not all) of your instances, you must still protect the database itself, which is shared by all the instances. This means that you need to consider disk backup and recovery strategies for your cluster database just as you would for a nonclustered database.
To minimize the potential loss of data due to disk failures, you may want to use disk mirroring technology (available from your server or disk vendor). As in nonclustered databases, you can have more than one mirror if your vendor allows it, to help reduce the potential for data loss and to provide you with alternative backup strategies. For example, with your database in ARCHIVELOG mode and with three copies of your disks, you can remove one mirror copy and perform your backup from it while the two remaining mirror copies continue to protect ongoing disk activity. To do this correctly, you must first put the tablespaces into backup mode and then, if required by your cluster or disk vendor, temporarily halt disk operations by issuing the ALTER SYSTEM SUSPEND command. After the statement completes, you can break the mirror and then resume normal operations by executing the ALTER SYSTEM RESUME command and taking the tablespaces out of backup mode.
Media Recovery in Oracle RAC
Media recovery must be user-initiated through a client application, whereas instance recovery is automatically performed by the database. In these situations, use RMAN to restore backups of the data files and then recover the database. The procedures for RMAN media recovery in Oracle RAC environments do not differ substantially from the media recovery procedures for single-instance environments.
The node that performs the recovery must be able to restore all of the required data files. That node must also be able to either read all the required archived redo logs on disk or be able to restore them from backups. Each instance generates its own archive logs that are copies of its dedicated redo log group threads. It is recommended that Automatic Storage Management (ASM) or a cluster file system be used to consolidate these files.
When recovering a database with encrypted tablespaces (for example, after a SHUTDOWN ABORT or a catastrophic error that brings down the database instance), you must open the Oracle Wallet after database mount and before you open the database, so the recovery process can decrypt data blocks and redo.
Summary
- Media recovery must be user-initiated through a client application.
- In these situations, use RMAN to restore backups of the data files and then recover the database.
- RMAN media recovery procedures for RAC do not differ substantially from those for single-instance environments.
- The node that performs the recovery must be able to restore all of the required data files. That node must also be able to either read all required archived redo logs on disk or restore them from backups.
- When recovering a database with encrypted tablespaces, the wallet must be opened after database mount and before you open the database.
Parallel Recovery in RAC
Oracle Database automatically selects the optimum degree of parallelism for instance and crash recovery. Oracle Database applies archived redo logs using an optimal number of parallel processes based on the availability of CPUs. With RMAN’s RESTORE and RECOVER commands, Oracle Database automatically uses parallelism for the following three stages of recovery:
- Restoring Data Files: When restoring data files, the number of channels you allocate in the RMAN recover script effectively sets the parallelism that RMAN uses. For example, if you allocate five channels, you can have up to five parallel streams restoring data files.
- Applying Incremental Backups: Similarly, when you are applying incremental backups, the number of channels you allocate determines the potential parallelism.
- Applying Archived Redo Logs with RMAN: Oracle Database automatically selects the optimum degree of parallelism based on available CPU resources.
To disable parallel instance and crash recovery on a system with multiple CPUs, set the RECOVERY_PARALLELISM parameter to 0 or 1.
Use the NOPARALLEL clause of the RMAN RECOVER command or ALTER DATABASE RECOVER statement to force the RAC database to use nonparallel media recovery.
RAC and the Fast Recovery Area
To use a fast recovery area in RAC, you must place it on an ASM disk group, a cluster file system, or on a shared directory that is configured through certified NFS for each RAC instance. That is, the fast recovery area must be shared among all the instances of a RAC database. In addition, set the DB_RECOVERY_FILE_DEST parameter to the same value on all instances.
Oracle Enterprise Manager enables you to set up a fast recovery area. To use this feature:
- From the Cluster Database Home page, click the Availability pull-down menu.
- Select Backup and Recovery > Recovery Settings.
- Specify your requirements in the Flash Recovery Area section of the page.