How to Configure firewalld in CentOS/RHEL 8 using "Web Console" and "firewall-cmd"
Firewall Architecture Concepts
The Linux kernel includes netfilter, a framework for network traffic operations such as packet filtering, network address translation and port translation. By implementing handlers in the kernel that intercept function calls and messages, netfilter allows other kernel modules to interface directly with the kernel’s networking stack. Firewall software uses these hooks to register filter rules and packet-modifying functions, allowing every packet going through the network stack to be processed. Any incoming, outgoing, or forwarded network packet can be inspected, modified, dropped, or routed programmatically before reaching user space components or applications. Netfilter is the primary component in CentOS/RHEL 8 firewalls.
Nftables enhances netfilter
The Linux kernel also includes nftables, a new filter and packet classification subsystem that has enhanced portions of netfilter’s code, but retaining the netfilter architecture such as networking stack hooks, connection tracking system, and the logging facility. The advantages of the nftables update is faster packet processing, faster ruleset updates, and simultaneous IPv4 and IPv6 processing from the same rules. Another major difference between nftables and the original netfilter are their interfaces. Netfilter is configured through multiple utility frameworks, including iptables, ip6tables, arptables, and ebtables, which are now deprecated. Nftables uses the single nft user-space utility, allowing all protocol management to occur through a single interface, eliminating historical contention caused by diverse front ends and multiple netfilter interfaces.
Introducing firewalld
Firewalld is a dynamic firewall manager, a front end to the nftables framework using the nft command. Until the introduction of nftables, firewalld used the iptables command to configure netfilter directly, as an improved alternative to the iptables service. In CentOS/RHEL 8, firewalld remains the recommended front end, managing firewall rulesets using nft. Firewalld remains capable of reading and managing iptables configuration files and rulesets, using xtables-nft-multi to translate iptables objects directly into nftables rules and objects. Although strongly discouraged, firewalld can be configured to revert to the iptables back-end for complex use cases where existing iptables rulesets cannot be properly processed by nft translations.
Applications query the subsystem using the D-Bus interface. The firewalld subsystem, available from the firewalld RPM package, is not included in a minimal install, but is included in a base installation. With firewalld, firewall management is simplified by classifying all network traffic into zones. Based on criteria such as the source IP address of a packet or the incoming network interface, traffic is diverted into the firewall rules for the appropriate zone. Each zone has its own list of ports and services that are either open or closed.
Firewalld checks the source address for every packet coming into the system. If that source address is assigned to a specific zone, the rules for that zone apply. If the source address is not assigned to a zone, firewalld associates the packet with the zone for the incoming network interface and the rules for that zone apply. If the network interface is not associated with a zone for some reason, then firewalld associates the packet with the default zone.
The default zone is not a separate zone, but is a designation for an existing zone. Initially, firewallddesignates the public zone as default, and maps the lo loopback interface to the trusted zone. Most zones allow traffic through the firewall, which matches a list of particular ports and protocols, such as 631/udp, or pre-defined services, such as ssh. If the traffic does not match a permitted port and protocol or service, it is generally rejected. (The trusted zone, which permits all traffic by default, is one exception to this.)
Pre-defined Zones
Firewalld has pre-defined zones, each of which you can customize. By default, all zones permit any incoming traffic which is part of a communication initiated by the system, and all outgoing traffic. The following table details these initial zone configuration.
Default Configuration of Firewalld Zones
| ZONE NAME | DEFAULT CONFIGURATION |
|---|---|
| trusted | Allow all incoming traffic. |
| home | Reject incoming traffic unless related to outgoing traffic or matching the ssh, mdns, ipp-client, samba-client, or dhcpv6-client pre-defined services. |
| internal | Reject incoming traffic unless related to outgoing traffic or matching the ssh, mdns, ipp-client, samba-client, or dhcpv6-client pre-defined services (same as the home zone to start with). |
| work | Reject incoming traffic unless related to outgoing traffic or matching the ssh, ipp-client, or dhcpv6-client pre-defined services. |
| public | Reject incoming traffic unless related to outgoing traffic or matching the ssh or dhcpv6-client pre-defined services. The default zone for newly added network interfaces. |
| external | Reject incoming traffic unless related to outgoing traffic or matching the ssh pre-defined service. Outgoing IPv4 traffic forwarded through this zone is masqueraded to look like it originated from the IPv4 address of the outgoing network interface. |
| dmz | Reject incoming traffic unless related to outgoing traffic or matching the ssh pre-defined service. |
| block | Reject all incoming traffic unless related to outgoing traffic. |
| drop | Drop all incoming traffic unless related to outgoing traffic (do not even respond with ICMP errors). |
For a list of available pre-defined zones and intended use, see firewalld.zones.
Pre-defined Services
Firewalld has a number of pre-defined services. These service definitions help you identify particular network services to configure. Instead of having to research relevant ports for the samba-client service, for example, specify the pre-built samba-client service to configure the correct ports and protocols. The following table lists the pre-defined services used in the initial firewall zones configuration.
Selected Pre-defined Firewalld Services
| SERVICE NAME | CONFIGURATION |
|---|---|
| ssh | Local SSH server. Traffic to 22/tcp |
| dhcpv6-client | Local DHCPv6 client. Traffic to 546/udp on the fe80::/64 IPv6 network |
| ipp-client | Local IPP printing. Traffic to 631/udp. |
| samba-client | Local Windows file and print sharing client. Traffic to 137/udp and 138/ udp. |
| mdns | Multicast DNS (mDNS) local-link name resolution. Traffic to 5353/udp to the 224.0.0.251 (IPv4) or ff02::fb (IPv6) multicast addresses. |
Configuring the Firewall
System administrators interact with firewalld in three ways:
- Directly edit configuration files in /etc/firewalld/ (not discussed in this post)
- The Web Console graphical interface
- The firewall-cmd command-line tool
Configuring Firewall Services Using the Web Console
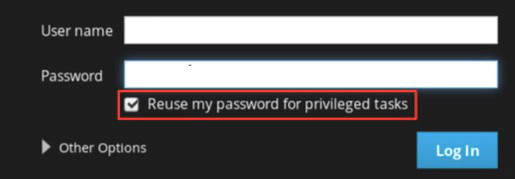
To configure firewall services with Web Console, log in with privileged access by clicking the Reuse my password for privileged tasks option. This permits the user to execute commands with sudo privileges to modify firewall services.
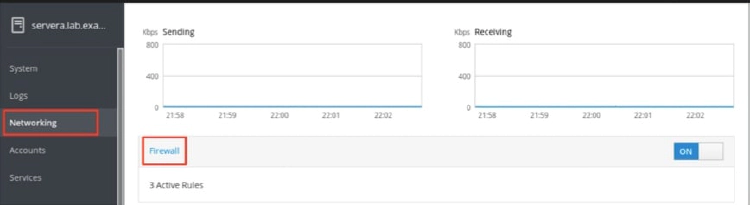
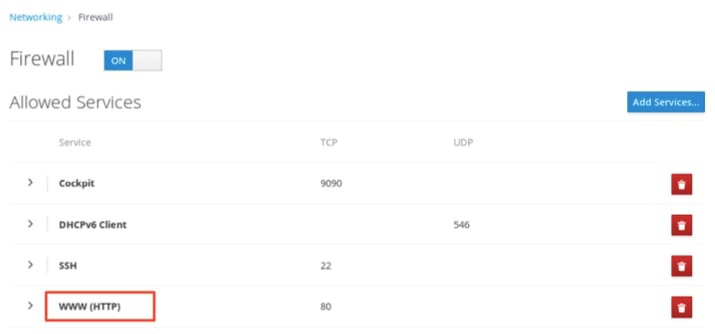
Click the Networking option in the left navigation menu to display the Firewall section in the main networking page. Click the Firewall link to access the allowed services list.
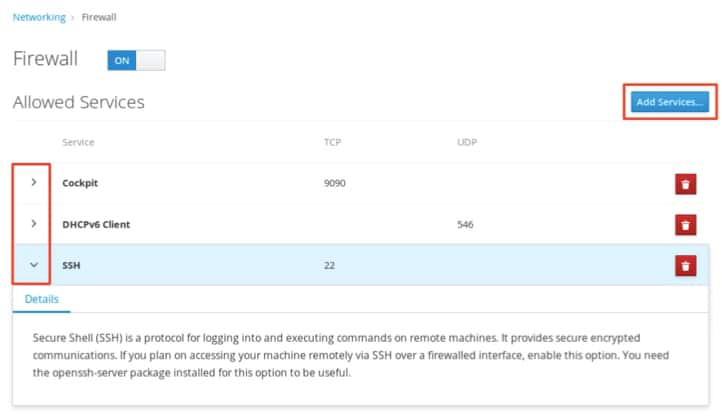
The allowed services listed are those that are currently permitted by the firewall. Click the arrow (>) to the left of the service name to view service details. To add a service, click the Add Services… button in the upper right corner of the Firewall Allowed Services page.
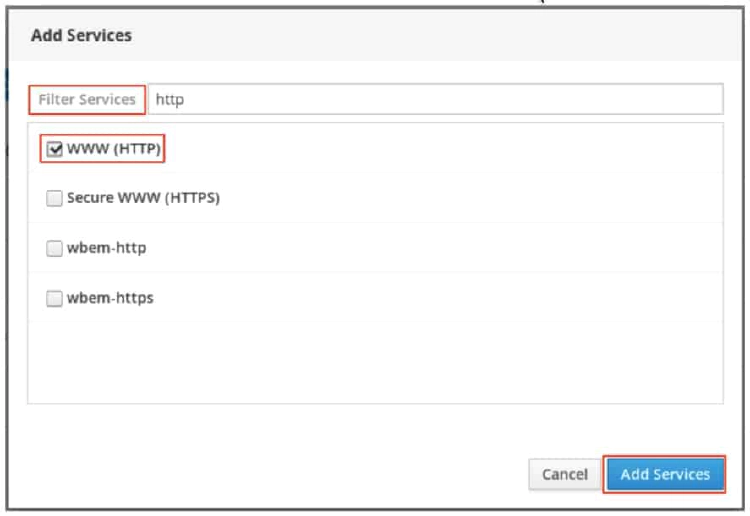
The Add Services page displays the available pre-defined services.
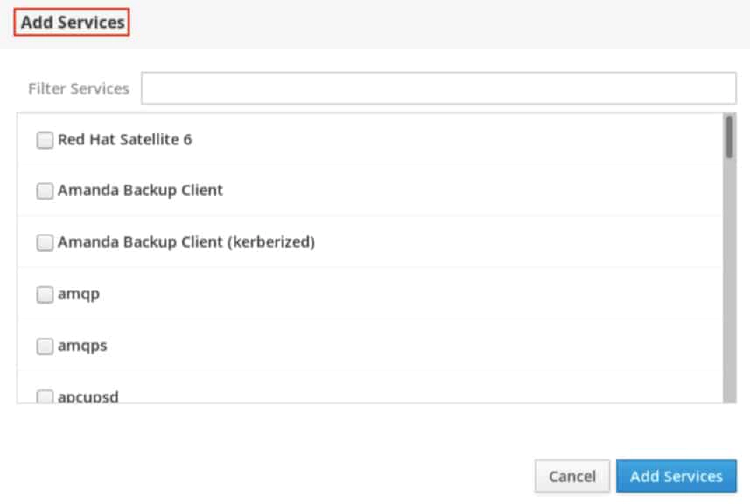
To select a service, scroll through the list or enter a selection in the Filter Services text box. In the following example, the string http is entered into the search text box to find services containing that string; that is, web related services. Select the check box to the left of the services to allow through the firewall. Click the Add Services button to complete the process.
The interface returns to the Firewall Allowed Services page, where you can review the updated allowed services list.
Configuring the Firewall from the Command Line
The firewall-cmd command interacts with the firewalld dynamic firewall manager. It is installed as part of the main firewalld package and is available for administrators who prefer to work on the command line, for working on systems without a graphical environment, or for scripting a firewall setup.
The following table lists a number of frequently used firewall-cmd commands, along with an explanation. Note that unless otherwise specified, almost all commands will work on the runtime configuration, unless the –permanent option is specified. If the –permanent option is specified, you must activate the setting by also running the firewall-cmd –reload command, which reads the current permanent configuration and applies it as the new runtime configuration. Many of the commands listed take the –zone=ZONE option to determine which zone they affect. Where a netmask is required, use CIDR notation, such as 192.168.1/24.
| FIREWALL-CMD COMMANDS | EXPLANATION |
|---|---|
| –get-default-zone | Query the current default zone. |
| –set-default-zone=ZONE | Set the default zone. This changes both the runtime and the permanent configuration. |
| –get-zones | List all available zones. |
| –get-active-zones | List all zones currently in use (have an interface or source tied to them), along with their interface and source information. |
| –add-source=CIDR [–zone=ZONE] | Route all traffic coming from the IP address or network/netmask to the specified zone. If no –zone= option is provided, the default zone is used. |
| –remove-source=CIDR [–zone=ZONE] | Remove the rule routing all traffic from the zone coming from the IP address or network/ netmask network. If no –zone= option is provided, the default zone is used. |
| –add-interface=INTERFACE [–zone=ZONE] | Route all traffic coming from INTERFACE to the specified zone. If no –zone= option is provided, the default zone is used. |
| –change-interface=INTERFACE [–zone=ZONE] | Associate the interface with ZONE instead of its current zone. If no –zone= option is provided, the default zone is used. |
| –list-all [–zone=ZONE] | List all configured interfaces, sources, services, and ports for ZONE. If no –zone= option is provided, the default zone is used. |
| –list-all-zones | Retrieve all information for all zones (interfaces, sources, ports, services). |
| –add-service=SERVICE [–zone=ZONE] | Allow traffic to SERVICE. If no –zone= option is provided, the default zone is used. |
| –add-port=PORT/PROTOCOL [–zone=ZONE] | Allow traffic to the PORT/PROTOCOL port(s). If no –zone= option is provided, the default zone is used. |
| –remove-service=SERVICE [–zone=ZONE] | Remove SERVICE from the allowed list for the zone. If no –zone= option is provided, the default zone is used. |
| –remove-port=PORT/PROTOCOL [–zone=ZONE] | Remove the PORT/PROTOCOL port(s) from the allowed list for the zone. If no –zone= option is provided, the default zone is used. |
| –reload | Drop the runtime configuration and apply the persistent configuration. |
The example commands below set the default zone to dmz, assign all traffic coming from the 192.168.0.0/24 network to the internal zone, and open the network ports for the mysql service on the internal zone.
[root@host ~]# firewall-cmd --set-default-zone=dmz
[root@host ~]# firewall-cmd --permanent --zone=internal --add-source=192.168.0.0/24
[root@host ~]# firewall-cmd --permanent --zone=internal --add-service=mysql
[root@host ~]# firewall-cmd --reload