How to use nice and renice commands in Linux to prioritize or de-prioritize specific processes
Linux Process Scheduling and Multi-Tasking
Modern computer systems range from low-end systems that have single CPUs that can only execute a single instruction at any instance of time to high-performing supercomputers with hundreds of CPUs each and dozens or even hundreds of processing cores on each CPU, allowing the execution of huge numbers of instructions in parallel. All these systems still have one thing in common: the need to run more process threads than they have CPUs.
Linux and other operating systems run more processes than there are processing units using a technique called time-slicing or multitasking. The operating system process scheduler rapidly switches between processes on a single-core, giving the impression that there are multiple processes running at the same time.
Relative Priorities
Different processes have different levels of importance. The process scheduler can be configured to use different scheduling policies for different processes. The scheduling policy used for most processes running on a regular system is called SCHED_OTHER (also called SCHED_NORMAL), but other policies exist for various workload needs.
Since not all processes are equally important, processes running with the SCHED_NORMAL policy can be given a relative priority. This priority is called the nice value of a process, which are organized as 40 different levels of niceness for any process.
The nice level values range from -20 (highest priority) to 19 (lowest priority). By default, processes inherit their nice level from their parent, which is usually 0. Higher nice levels indicate less priority (the process easily gives up its CPU usage), while lower nice levels indicate a higher priority (the process is less inclined to give up the CPU). If there is no contention for resources, for example, when there are fewer active processes than available CPU cores, even processes with a high nice level will still use all available CPU resources they can. However, when there are more processes requesting CPU time than available cores, the processes with a higher nice level will receive less CPU time than those with a lower nice level.
Setting nice levels and permissions
Since setting a low nice level on a CPU-hungry process might negatively impact the performance of other processes running on the same system, only the root user may reduce a process nice level.
Unprivileged users are only permitted to increase nice levels on their own processes. They cannot lower the nice levels on their processes, nor can they modify the nice level of other users’ processes.
Reporting nice levels
Several tools display the nice levels of running processes. Process management tools, such as top, display the nice level by default. Other tools, such as the ps command, display nice levels when using the proper options.
Displaying Nice Levels with Top
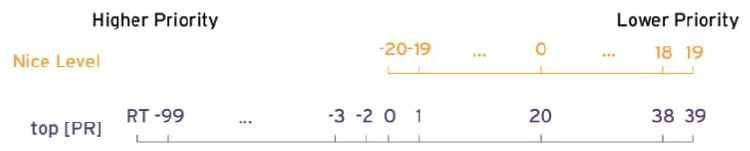
Use the top command to interactively view and manage processes. The default configuration displays two columns of interest about nice levels and priorities. The NI column displays the process nice value and the PR column displays its scheduled priority. In the top interface, the nice level maps to an internal system priority queue as displayed in the following graphic. For example, a nice level of -20 maps to 0 in the PR column. A nice level of 19 maps to a priority of 39 in the PR column.
Displaying Nice Levels from the Command Line
The ps command displays process nice levels, but only by including the correct formatting options. The following ps command lists all processes with their PID, process name, nice level, and scheduling class, sorted in descending order by nice level. Processes that display TS in the CLS scheduling class column, run under the SCHED_NORMAL scheduling policy. Processes with a dash (-) as their nice level, run under other scheduling policies and are interpreted as a higher priority by the scheduler. Details of the additional scheduling policies are beyond the scope of this course.
[user@host ~]$ ps axo pid,comm,nice,cls --sort=-nice
PID COMMAND          NI CLS
30 khugepaged       19  TS
29 ksmd              5  TS
1 systemd            0  TS
2 kthreadd           0  TS
9 ksoftirqd/0        0  TS
10 rcu_sched         0  TS
11 migration/0       -  FF
12 watchdog/0        -  FF
...output omitted...
Starting processes with different nice levels
During process creation, a process inherit its parent’s nice level. When a process is started from the command line, it will inherit its nice level from the shell process where it was started. Typically, this results in new processes running with a nice level of 0.
The following example starts a process from the shell, and displays the process’s nice value. Note the use of the PID option in the ps to specify the output requested.
[user@host ~]$ sha1sum /dev/zero &
[1] 3480

[user@host ~]$ ps -o pid,comm,nice 3480
 PID COMMAND           NI
3480 sha1sum           0
The nice command can be used by all users to start commands with a default or higher nice level. Without options, the nice command starts a process with the default nice value of 10.
The following example starts the sha1sum command as a background job with the default nice level and displays the process’s nice level:
[user@host ~]$ nice sha1sum /dev/zero &
[1] 3517

[user@host ~]$ ps -o pid,comm,nice 3517
PID  COMMAND          NI
3517 sha1sum          10
Use the -n option to apply a user-defined nice level to the starting process. The default is to add 10 to the process’ current nice level. The following example starts a command as a background job with a user-defined nice value and displays the process’s nice level:
[user@host ~]$ nice -n 15 sha1sum &
[1] 3521

[user@host ~]$ ps -o pid,comm,nice 3521
PID COMMAND          NI
3521 sha1sum          15
Changing the nice level of an existing process
The nice level of an existing process can be changed using the renice command. This example uses the PID identifier from the previous example to change from the current nice level of 15 to the desired nice level of 19.
[user@host ~]$ renice -n 19 3521
3521 (process ID) old priority 15, new priority 19
The top command can also be used to change the nice level on a process. From within the top interactive interface, press the r option to access the renice command, followed by the PID to be changed and the new nice level.