Managing System clock using chrony in CentOS/RHEL 7
The chrony package provides a chronyd service daemon and chronyc utility that enable mobile systems and virtual machines to update their system clock after a period of suspension or disconnection from a network. Chrony is an NTP client and server designed to work well without a permanent network connection. It uses different algorithms to discipline the clock which gives chrony several advantages over ntp:
- Works well even with irregular polling of NTP servers, useful for laptops or systems without permanent network connection.
- Much faster synchronization, it usually needs only minutes instead of hours to minimize the time and frequency error, useful for systems not running 24/7.
- Larger range for frequency correction (100000 ppm vs 500 ppm), useful for systems running in virtual machines which may have quickly drifting clocks.
- After the initial synchronization the clock is never stepped, this is good for applications which need system time to be monotonic.
- Better response to rapid changes in the clock frequency, useful for systems running in virtual machines.
- Better stability with temporary asymmetric delays, e.g. when the link is saturated by a large download.
The computer relies on the real-time clock (RTC) to maintain the correct time during shutdown and offline periods. At boot up, chronyd sets the system time to RTC time. When the Internet connection is made, chronyd starts measuring the error and drift rate between system and RTC time, gradually bring both times into sync with the NTP time signal. After a number of hours online, both system time and RTC time will equal true time.
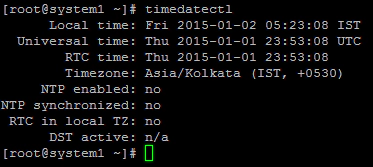
Let’s see how to check the system date and time in RHEL 7.0 before we configure the chronyd to maintain the system clock. In CentOS/RHEL 7 we have a command “timedatectl” to check the time and date information. Here is the sample output.
timedatectl command has many sub-options to set time date and other properties related to time and date. refer the manpage for more information. Here are a few options :
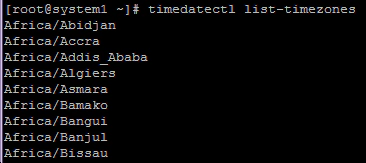
To list timezones run the command
# timedatectl list-timezones
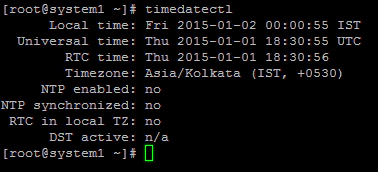
Set the time and date using the following command.
# timedatectl set-time "2015-01-02 00:00:55"
Let’s verify the time again after settings it. Run timedatectl command again.
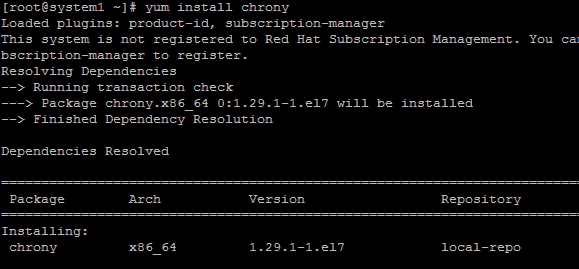
Now let’s configure NTP Client using chronyd to set the system clock. First, we need to install the chrony package using YUM. The chrony package provides a chronyd service daemon and chronyc utility. Run the following command to install the chrony package.
# yum install chrony
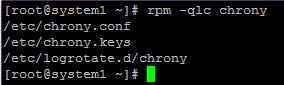
Run “rpm -qlc chrony” command to see the configuration files for chrony package.
Now edit the /etc/chrony.conf file to configure the NTP client. Edit this file and add the NTP server details.
# vim /etc/chrony.conf
Add the following line in this file:
server ntp1.thegeeksearch.com iburst
There are few options we could give after mentioned in the NTP server details in /etc/chrony.conf here are they:
- offline - If the server will not be reachable when chronyd is started, the offline option may be specified. chronyd will not try to poll the server until it is enabled to do so (by using the online option of chronyc).
- auto_offline - If this option is set, the server will be assumed to have gone offline when 2 requests have been sent to it without receiving a response. This option avoids the need to run the offline (see section offline) command from chrony when disconnecting the dial-up link.
- iburst - On start, make four measurements over a short duration (rather than the usual periodic measurements).
- minstratum - When the synchronisation source is selected from available sources, sources with lower stratum are normally preferred. This option can be used to increase the stratum of the source to the specified minimum, so chronyd will avoid selecting that source. This is useful with low stratum sources that are known to be unreliable or inaccurate and which should be used only when other sources are unreachable.
- polltarget - Target number of measurements to use for the regression algorithm which chronyd will try to maintain by adjusting polling interval between minpoll and maxpoll. A higher target makes chronyd prefer shorter polling intervals. The default is 6 and a useful range is 6 to 60.
- prefer - Prefer this source over sources without prefer option.
- noselect - Never select this source. This is particularly useful for monitoring.
After setting the NTP server details in /etc/chrony.conf restart the chronyd daemon to get the effects.
# systemctl restart chronyd
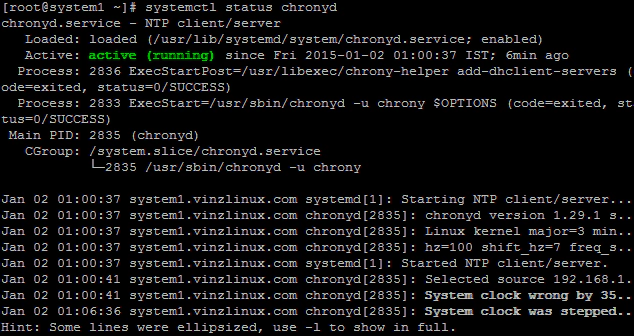
Check the service status using the following command:
# systemctl status chronyd
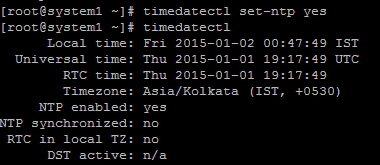
Enable the NTP using the following command.
# timedatectl set-ntp yes
Now lets monitor the chronyd daemon using chronyc utility. Run the command “chronyc sources -v” to display information about the current set of sources:
# chronyc sources -v
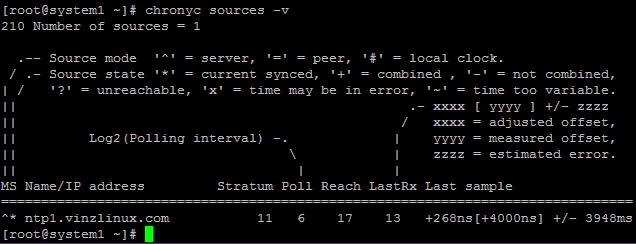
We can see that this server is now synced with the NTP server in our network. To display the rate & offset estimation performance of sources run:
# chronyc sourcestats command

To display system clock performance run “chronyc tracking” command.
# chronyc tracking